One Photo. A Printable, Game-Ready 3D Model. Here Is What the Hitem3D Suite Does.
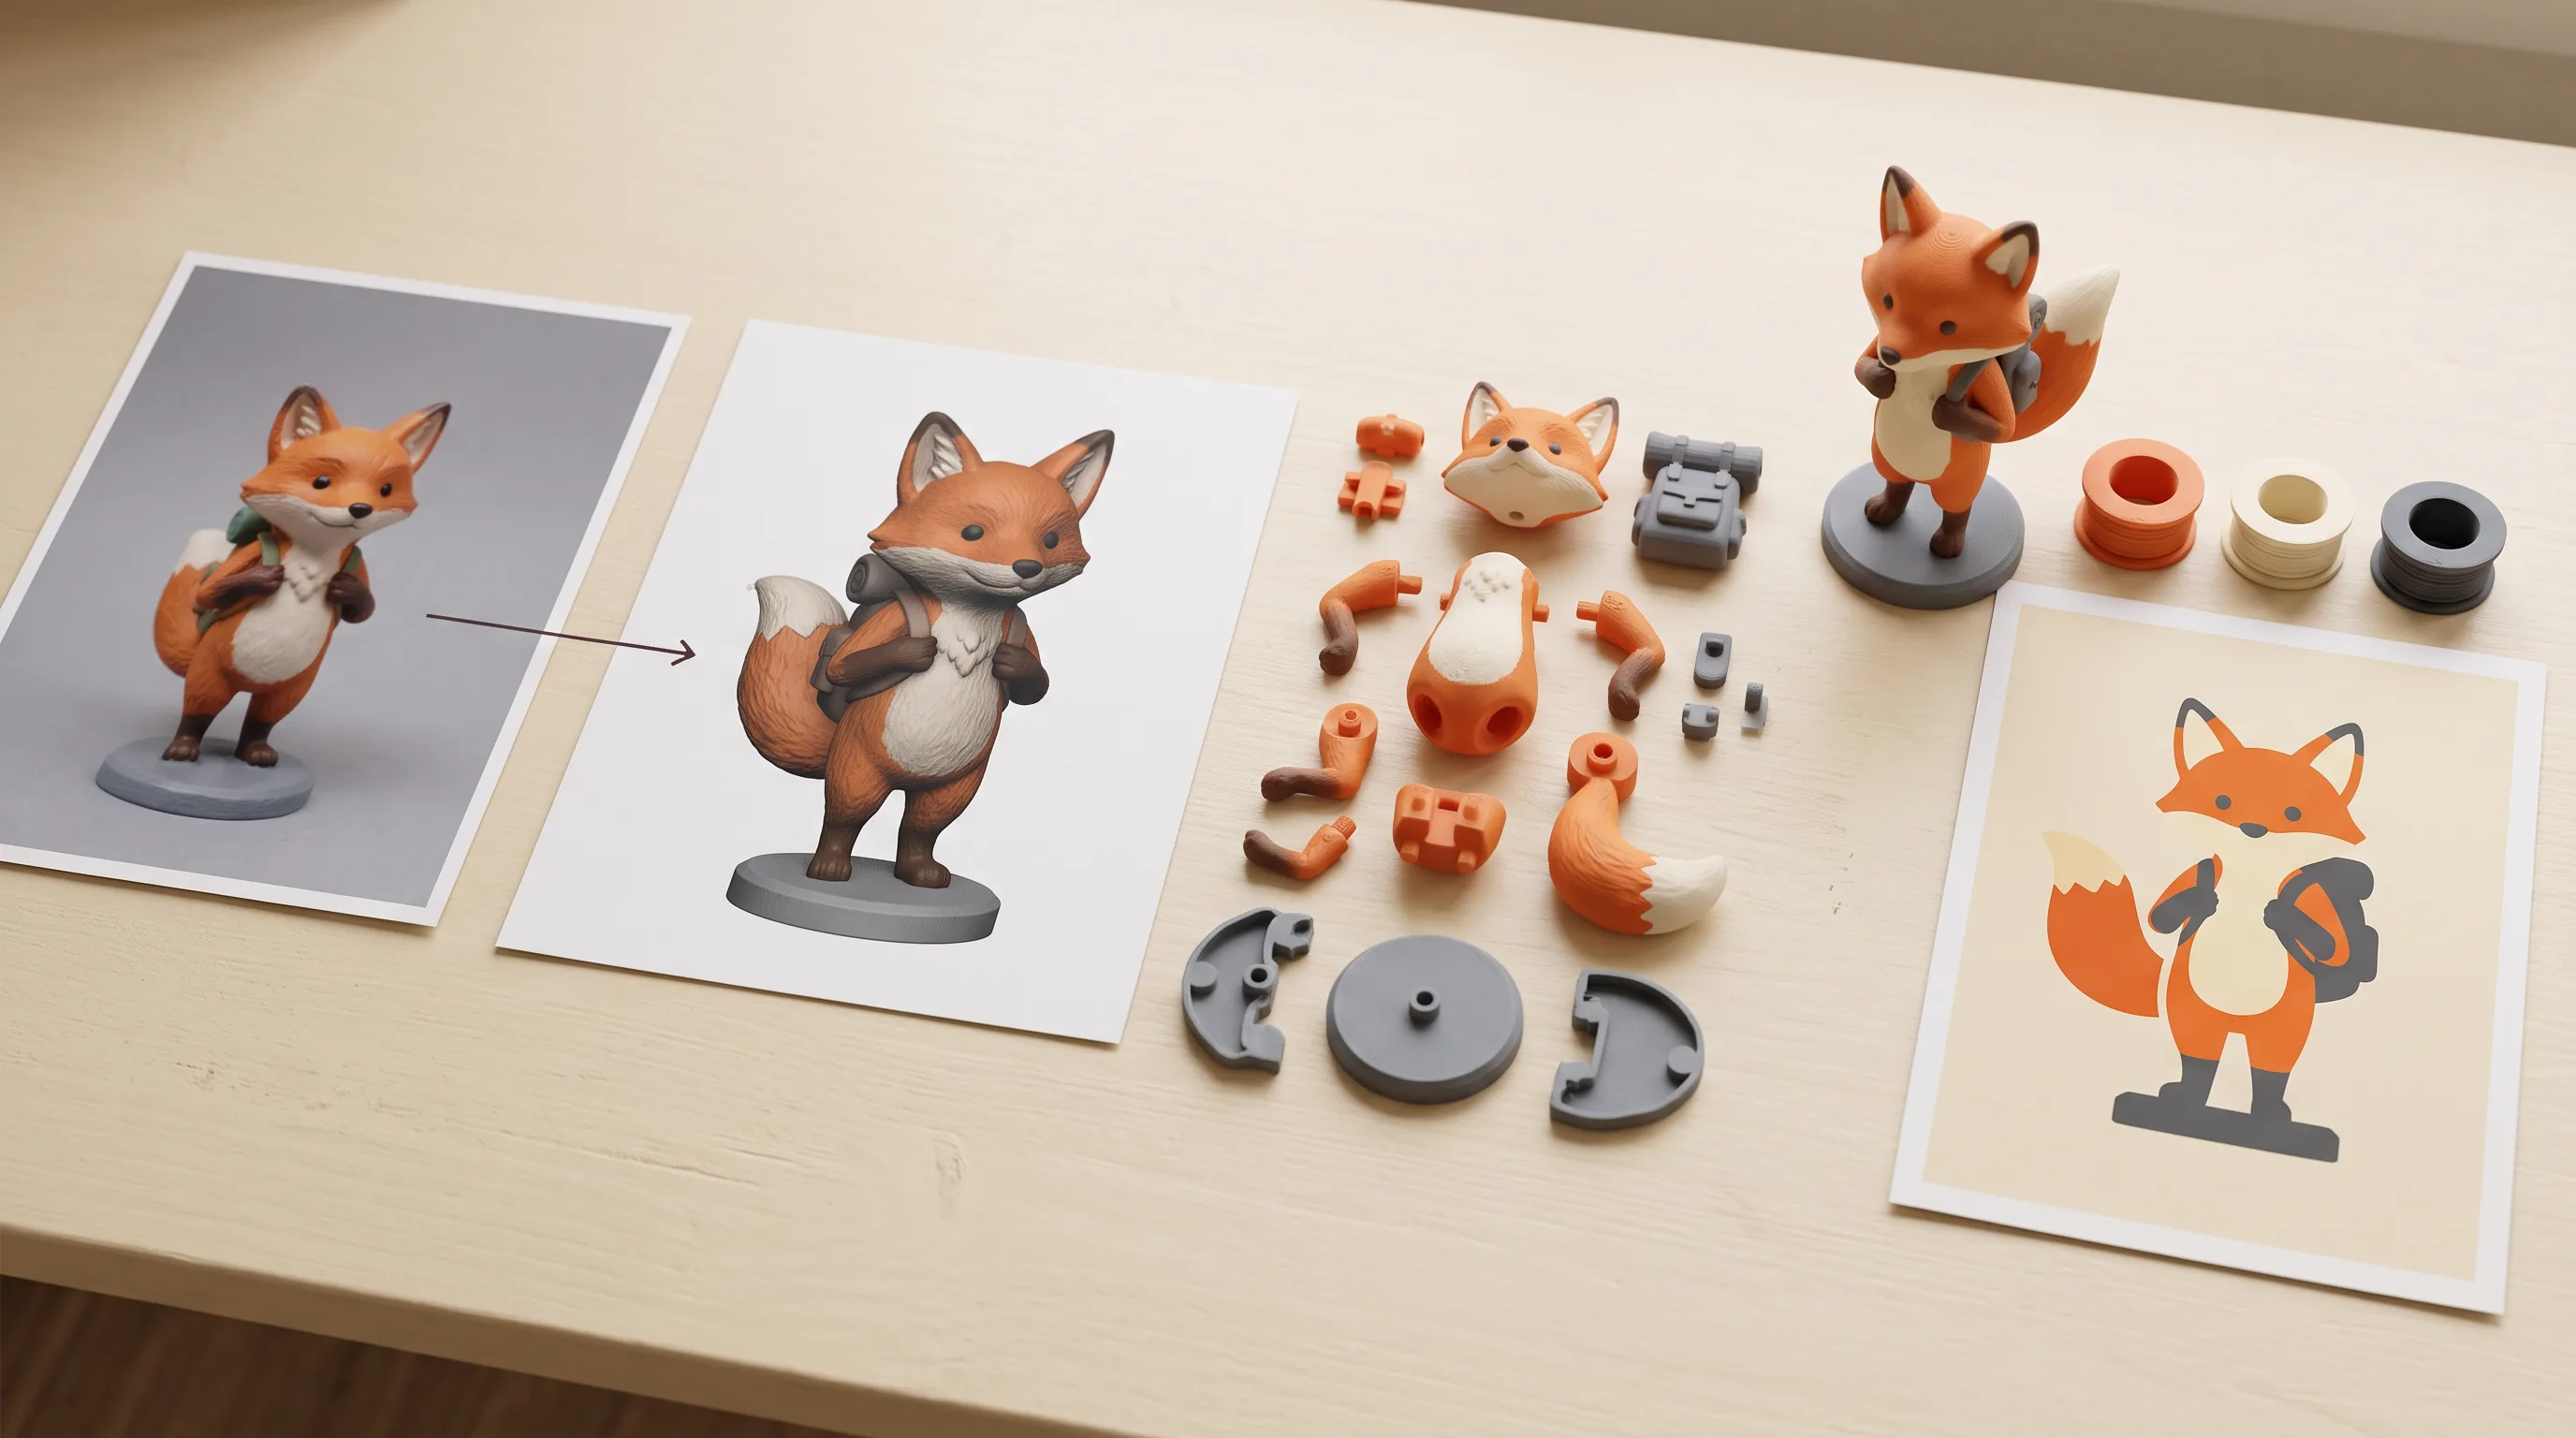
Hitem3D 3.0 generates a full 3D mesh from a single photo. Hitem3D Split cuts it into assembly-ready parts with print joints. Hitem3D Multicolor reduces the surface to a flat filament palette. Three tools that chain into a complete pipeline from photo to printed, multi-color model.
Most image-to-3D tools stop at the mesh. You get a model, you download it, and then you figure out the rest: how to get it print-ready, how to cut it into parts that fit a printer bed, how to map colors to filaments for a multi-filament printer. Each step is its own tool, its own workflow, its own friction.
The Hitem3D suite on Scenario covers the whole pipeline in three connected tools. Hitem3D 3.0 generates the geometry. Hitem3D Split cuts it into parts. Hitem3D Multicolor sets the color palette. Use all three in sequence or any one of them on its own.
Here is what each tool does and where it fits.
Hitem3D 3.0: From Photo to Full 3D Mesh
Hitem3D 3.0 takes one to four reference photos and generates a full 3D asset: a bare mesh, or a mesh with a complete PBR texture set, in a single pass.
One photo is enough for most things. A sharply lit photo of the subject on a plain background gives the model enough to work with for props, objects, and hard-surface assets. Frame the subject at 60 to 80 percent of the image. Even lighting, no harsh shadows, plain background. That is the setup that produces the cleanest reconstruction.
Multi-view input for sharper results. Up to four views in front, back, left, right order. The important caveat: front and back combine cleanly, but adding side profiles from separately photographed or generated images frequently deforms the mesh, especially on wings, limbs, and asymmetric features. The profile view is where any small difference in pose or lighting between shots shows up most. Unless the four views came from a physical turntable with identical distance, height, and lighting across all shots, stick to front and back.
Mesh only or textured. Mesh and Texture is the default and returns a full PBR material alongside the mesh. Mesh Only skips texturing entirely and returns clean bare geometry for pipelines that texture by hand or in a separate tool.
Quality or Master resolution. 2048 Quality balances detail against cost and speed and covers most use cases. 2048 Master pushes for the highest geometry and topology quality the model can produce at noticeably higher cost and longer runtime: roughly four times longer than the equivalent Quality run in testing. Use Quality for iteration, Master for the final hero asset.
Hitem3D Split: Cut Any Mesh Into Printable Parts
Hitem3D Split takes a finished mesh and cuts it into separate, watertight pieces with proper print joints. It accepts GLB, STL, or OBJ up to 200MB. Hitem3D 3.0 output pairs naturally, and so does any other 3D source.
Two modes:
Character mode uses anatomy-aware templates. Choose how many parts you want, from a full six-part breakdown down to a two-part split, and a joint style for the seams. The templates run from part a (six parts) through part f (two parts), so you can match the breakdown to your printer bed and your painting plan.
General mode ignores anatomy and cuts any object by a granularity setting: low for a few large chunks, medium for a balanced split, high for many smaller pieces. High granularity is useful when a shape has thin walls or overhanging areas that print better separated.
Joints matter as much as the cut. Three options: none leaves a clean flat face for glued assemblies, ball adds a snap-fit peg and socket for repositionable connections, and dovetail cuts an interlocking wedge for a glue-free slide-fit that holds on its own. Pick based on how you plan to assemble: none for glue, ball for repositionable, dovetail for a clean glue-free finish.
Hitem3D Multicolor: Set the Filament Palette
Hitem3D Multicolor takes a textured GLB and reduces its surface colors to a fixed number of flat regions: anywhere from one color to eight. No gradients. Each region maps straight onto a filament, which means a multi-material printer can handle it with no manual masking.
Fewer colors give a bold, poster-like result. More colors preserve shading and detail from the original model. Two or three colors produce the clearest multi-filament look. Six to eight keep more of the original surface variation.
Set numberColor to 0 to keep the maximum palette when you plan to refine the colors downstream. Set it to 2 or 3 when you want the most obviously multi-filament output for printing.
Multicolor needs surface color to work from. A plain untextured mesh has nothing to quantize. Feed it a vertex-colored or textured GLB, which Hitem3D 3.0 produces by default.
The Full Pipeline
The three tools chain in a natural order. Generate with Hitem3D 3.0. Run Split to break the result into parts. Run Multicolor on each part to set its palette. The result is a kit where every piece prints in its own filament and clicks together on its joints without manual masking or hand-painting between steps.
Any 3D source works as the starting point for Split and Multicolor. If the mesh already exists from another tool, Tripo 3.1, Sparc3D, or anything else, bring it straight into Split or Multicolor without going through Hitem3D 3.0 first.
Where This Gets Used
Game props and assets. Turn a concept render or reference photo of a weapon, tool, or hard-surface prop into a game-ready mesh with PBR materials without a manual modeling pass.
Tabletop miniatures and figurines. Generate a character with Hitem3D 3.0, break it into a six-part kit with Split using dovetail joints, reduce each part to its filament palette with Multicolor. Photo to printable multi-color figurine kit in three steps.
Product visualization. Turn a single product photo into a spinnable 3D asset for an e-commerce page or product configurator.
Retopology and hand-painted pipelines. Use Mesh Only to get clean base geometry, then bring it into a DCC for texturing.
Oversized models. Split a model that does not fit a printer bed into pieces sized for the bed, then assemble on the joints.
Try Hitem3D Multicolor on Scenario
FAQ
What is the difference between the three Hitem3D tools?
Hitem3D 3.0 generates a 3D mesh from one to four photos. Hitem3D Split cuts a finished mesh into printable parts with joints. Hitem3D Multicolor reduces a textured model to a flat filament palette. They chain into a full pipeline but each works independently.
Can I use Split and Multicolor on meshes from other tools?
Yes. Both accept any mesh as input. Split takes GLB, STL, or OBJ. Multicolor takes a textured GLB. Tripo 3.1, Sparc3D, and any other 3D source works.
How many photos do I need for Hitem3D 3.0?
One is enough for most subjects. For sharper reconstruction, upload front and back views. Adding side profiles from separately photographed or generated images frequently deforms the mesh, so only add side profiles if all four views came from a real turntable with identical distance, height, and lighting.
What is the difference between Quality and Master resolution?
2048 Quality balances detail against cost and speed. 2048 Master maximizes geometry and topology quality at noticeably higher cost and roughly four times longer runtime. Use Quality for iteration, Master for the final asset.
What joint types does Split support?
None for a clean flat face, ball for a snap-fit peg and socket, and dovetail for an interlocking slide-fit wedge. Choose based on whether you plan to glue, reposition, or assemble without glue.
Does Multicolor work on untextured meshes?
No. Multicolor works from surface color, so it needs a vertex-colored or textured GLB. A plain untextured mesh has no color to quantize.